Tuesday, September 30, 2008

Building the LED frame

So I built my IR LED frame out of 15 IR LED powered off USB because it would mean I don't need a completely seperate power supply for it. Its also good because even if I can't use a computer to power it I can always use my iphone charger as its just usb port into a wall socket :).

So first off I used, http://ledcalculator.net/ to calculate the amount of resistance I needed to use USB power which is 5v.


(click for larger image)
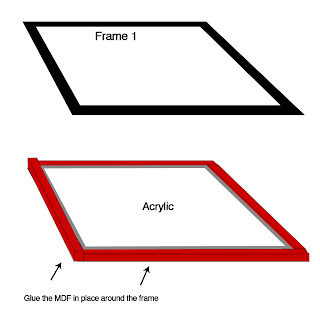
Then I cut my frame out of MDF because the aluminum L type bar I had was much to hard for me to work with considering the tools and skills I had. I cut out 2 layers on on top of the other then put in my acrylic and cut strips of MDF and glued them around the boarder to create a frame that it would sit in. Which the other layer would sit on top of sealing it in. This might not make sense so heres a diagram.

Once you've manage to wire up all your LEDS according to the diagram its time to test it all works. I should note first those when wiring and soldiering in the parts together take your time and wire everything correctly and double check everything as you go. If your camera has a nightmode like mine feel free to turn it on and enjoy seeing your LED work. Then take one moment to realise your project is actually working (so far). If they don't work double check your power source and ensure your LEDs are wired the correct way etc.


I used a small RCA connector to allow me to unplug the power from my frame in case I need to do repairs or take it apart for anyreason.


Completed frame covered in black duct tape with USB power cable.

Wednesday, September 24, 2008

The Build so far

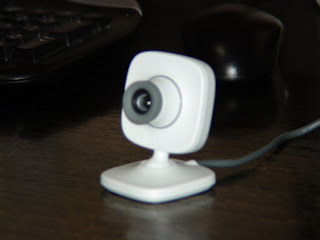
Ok so first off I started with modifying the Xbox Vision 360 camera by removing the IR filter.

I followed a simple pdf guide from put together by the good people of nui group you can find a link here. This was a fairly stright forward process with little difficulties.

Then I took apart my 17" hyundai monitar.
Taking the monitar apart just involed snapping all the plastic off with a flat head screw driver, and then removing a few screws.

Pop it out of the plastic housing and then turn over.


Undo all of the screws at the back holding on the metal, which is hiding the circuit boards.


Take off side rails by simply unscrewing them.


From here you can disconnect the circuit board wires on the back and go around the frame and unclip all of the edges and pull the frame from the panel and layers of diffusers


From here you should work out which layers your going to keep behind your lcd and which your going to get rid of. This is the one thing I couldn't find much information on which layers to keep or discard so I got rid of the last to but kept the big plastic board part and the layers underneath. Then I check with a remote control if IR light would be picked up through my modified camera. It worked so I'm gunna use these and I'll see how these work out.

Its now probably a good idea to double check your monitor is still working after all that tinkering. So I layed it all out on a table and plug in all the circuit boards to check it out.


Once you know its still working its time to continue with the rest of the build.

Sunday, September 21, 2008

Parts Collected

Ok so yesterday I was able to gather all the parts together that I'd need to complete my FTIR LCD multitouch setup.

Heres what I was able to get:

Dicksmith: 15 IR LEDS and some resistors
Bunnings: Acrylic, screws, bolts, some aluminum L shaped metal and MDF for my box that will contain everything.
ebgames: Xbox vision camera


I was able to get all the MDF I wanted for free. Bunnings has a lot of spare MDF that they get as lids for shipments or something so if you ask politely they will give it to you. Other wise they just throw it out.


(free MDF)

I already had a 17" LCD and various other materials available.

So now all the purchasing is complete I'll be trying to give you an in depth construction process from all the information I've learned from various blogs and of course the great www.nuigroup.com

Wednesday, September 17, 2008

Parts, materials and design

Ok so after much debate with myself thinking and planning for the design of my FTIR LCD setup I have come to a conclusion. Due to quite intense time constraints on my project I will constructing a simple cube. Roughly: Height 42cm, Width 45cm and 65cm Depth.
I really hate that I'm basically throwing out any ability to design something nice but unfortunately its function over form at the moment.

The Parts:
acrylic
IR Leds to surround frame
Wood for Box (MDF)
Webcam (with ir filter removed)
17" LCD mounted inside box with accessible cables.
Power supply for IR LEDS
Compliant surface (silicon pour onto acrylic)

I'll be purchasing all the parts soon and will start construction soon.

Thursday, September 11, 2008

Blog created, now for some content

Ok step 1 is now complete I have a place to put information about my upcoming project. During the coming weeks I'll be attempting to design and build a multi-touch screen.

I'll be using an old LCD monitor, perspex, IR Leds and a web cam to create a FTIR multi-touch interface.

So please come back later for more information about design construction and applications.